Bubble menu

Bubble menu

Enhanced Editor for the Bubble Menu

  1. The Bubble Menu in the Section Editor now sports a fresh look, mirroring features seen in the Loree Editor highlighted in green in the image below:

  2. The Section body of the bubble menu contains following features

Text Formatting Options:
  1. Undo: Reverses last action.
  2. Redo: Restores undone action.
  3. Bold: Makes text thicker and darker.
  4. Italic: Text slants to the right.
  5. Underline: Formats with line underneath.
  6. Text Formatting: Our text editor offers formatting options for changing text type, including heading from level 1 to level 6 and standard paragraph text.


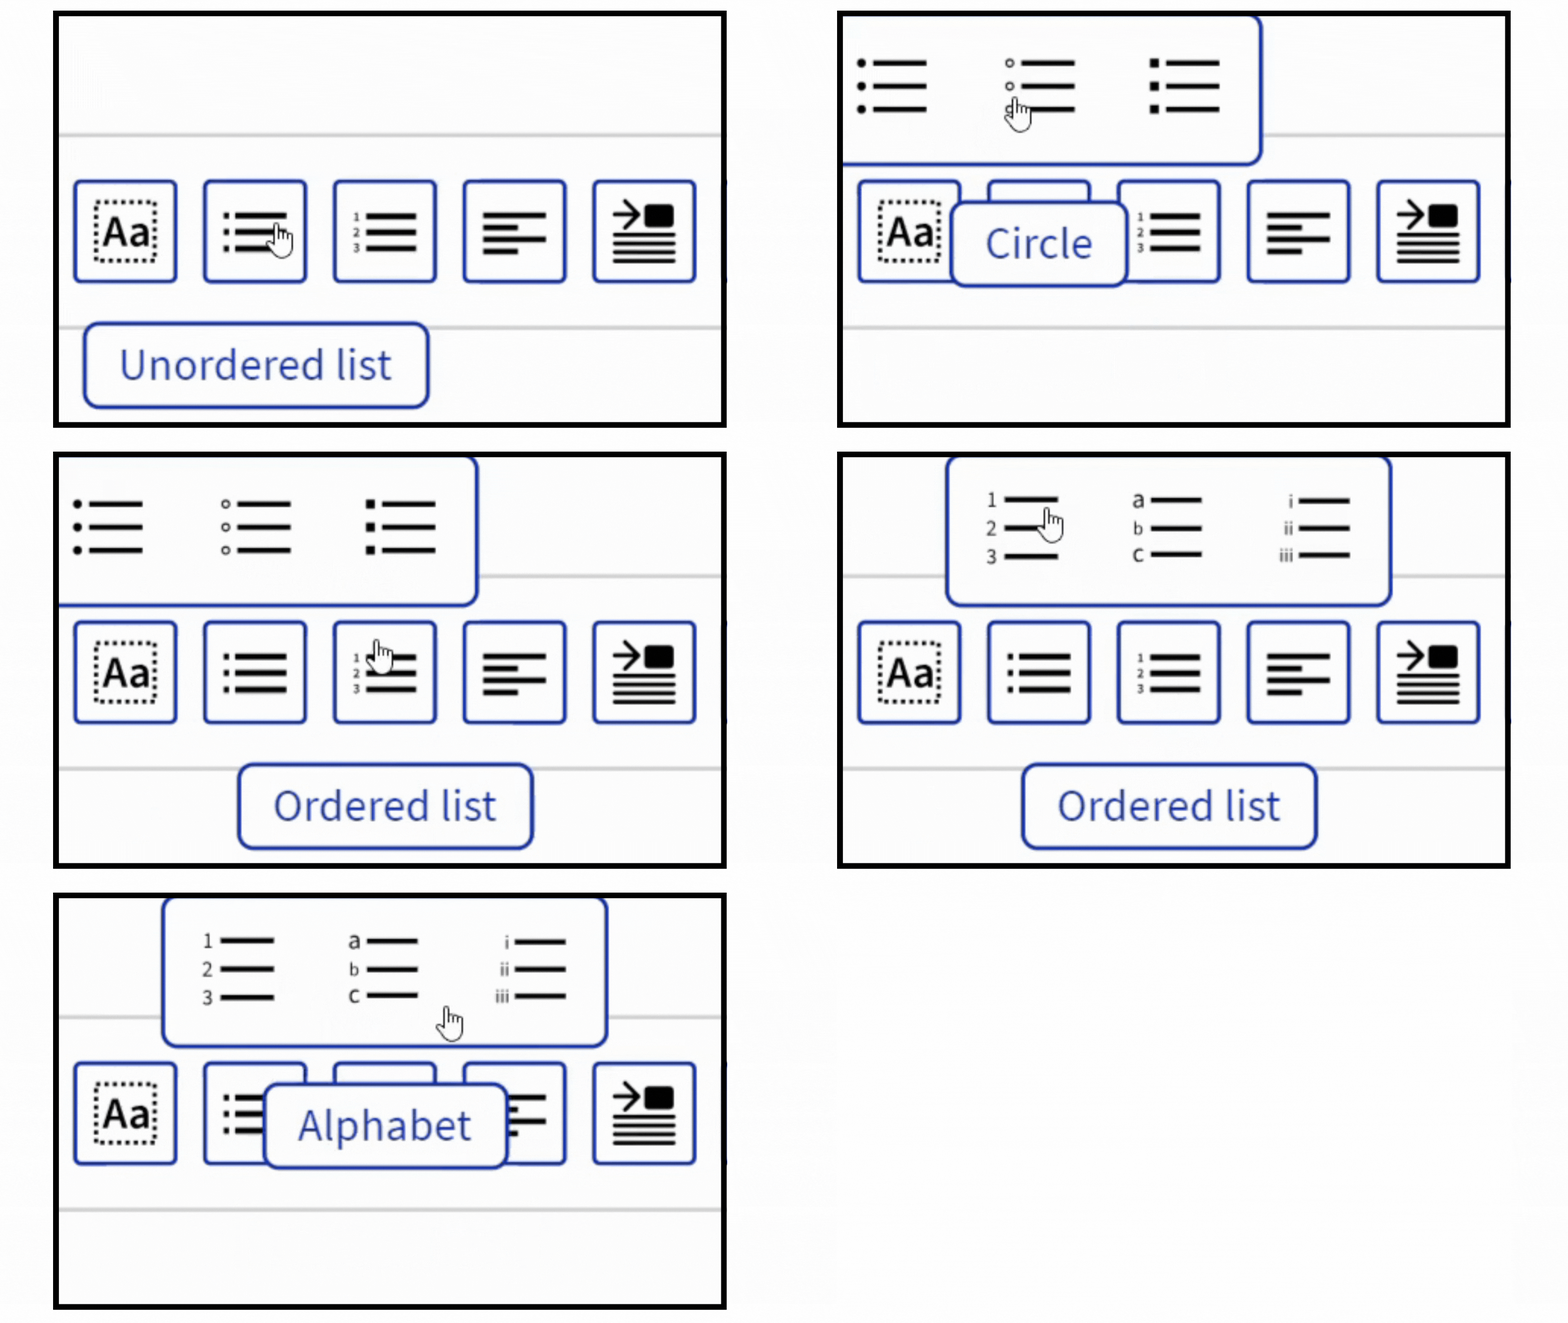
Bullet List: Unordered and Ordered

Unordered List:

  1. An unordered list organizes items with bullet points and is commonly used for clear and concise presentation of items or points.
  2. Each item is marked by a bullet or another symbol with  disc, circle, and square as supporting styles.

Ordered List:

  1. Ordered lists organize items with sequential numbers or letters.
  2. Styles include Numbers (1, 2, 3), Alphabet (a, b, c), and Roman (i, ii, iii) where each style serves different presentation needs based on hierarchy and clarity.


Text Alignment

  • Left-aligned: Text aligned to the left margin, straight edge on the right.
  • Center-aligned: Text centered between left and right margins.
  • Right-aligned: Text aligned to the right margin, straight edge on the left.
  • Justified: Text aligned to both margins, with space between words for straight edges on both sides.
  • Indent Spacing

    1. Increase Indent moves selected text further right for nested lists or hierarchical structures.
    2. Decrease Indent is enabled  only after Increase Indent; moves text closer to the left margin.
    3. Increase Text Indent adjusts the first line's indent in a paragraph, useful for hanging indents in lists.
    4. Decrease Text Indent is enabled only after Increase Text Indent; reduces the first line's indent to align with the left margin.

    Blockquote

  • Blockquote visually distinguishes quoted or excerpted text.
  • Indents the entire quoted text block.
  • Often applies different styling, like italics or a different font

  • Word Options

    1.  Loree Interactives now support word options such as Uppercase, lowercase, capitalize, strikethrough, and superscript neatly packed under the Word options.

    Line Spacing

    1. We offer line spacing options ranging from 0.8 to 2.5. 
    2. It adjusts the vertical distance between lines of text within a paragraph, allowing for customization to enhance readability and presentation.

    Media Content Library

    1. Image:
    1. Clicking the image option shows existing uploaded images in the Editor platform. 
    2. Users must upload course images as new to use in Loree Interactives. 
    3. Click to upload a new interactive image' option allows image uploads into the interactive.
    2. Icon: 
    1. Interactives now have their own Icon Library, similar to the Loree Editor. 
    2. Customize icon color, background, border, and size easily after adding it to your interactive.
    3. Video
    1. Direct uploads are not supported for the video option in media content. 
    2. Add videos by inserting links from YouTube, Vimeo, or other external URLs instead. Refer to the image on the right: 

    Please Note: Loree Interactive uses a separate content library for image media, distinct from the Loree Editor's library. This platform-based library is accessible to all launching Loree Interactive within the organization.

    Table

    For the first time, users can now add tables to their interactives using the Table option in the bubble menu:

    1. Create Table: 
    1. Click 'Create Table' to open a window for configuring table settings. 
    2. Use dropdown menus to select up to 10 rows and columns.
    3. At least one row or column selection is required to create the table. 
    4. Include a table caption to describe its content.

    2. Cell: 
    1. Customize table cells by selecting a cell, then navigating to Table > Cell in the bubble menu. 
    2. Options include Cell Properties, Merge Cell, and Split Cell menus for customization.
             a. Cell Properties
    1.  Customize cell padding (top, bottom, right, left) in pixels (px) to adjust spacing inside each cell, improving content layout. 
    2. The cell scope option enhances HTML accessibility by adding attributes to generated code, defaulting to 'none' but configurable as 'row,' 'column,' 'row group,' or 'column group' as needed. 
    3. Use Cell Properties to customize table cells, including border width, color, style, and background color.

    b. Merge Cell:

    Merge cell in the table by selecting at-least two cells and clicking on the merge option to combine them into a single merged cell.


    c. Split Cell: 

    After enabling the merge cell option, you can also split cells back into their original individual cells if needed.
    3Row: 
    1. Row menu options include: Insert row before, Insert row after, Delete row, and Row properties.
    2.  'Insert row before' adds a new row above the selected row, while 'Insert row after' adds one below it in a table. 
    3. 'Delete row' removes the selected row.
    4. Row properties allow customization of row attributes such as border width, style, color, and background.


     4. Column
    1. Column menu options include: 'Insert column before,' adding a column to the left of the selected one, and 'Insert column after,' placing a column to its right. 
    2. 'Delete column' removes the selected column, allowing flexible management of table structure and content.
    5. Table Properties: 
    1. Table properties offer extensive control over the table's appearance, including size, alignment, border width, color, style, and background color.
    2. Users can adjust settings for border collapse and separate to control how borders between adjacent cells appear, ensuring precise customization and layout control.


    6. Delete Table: This option allows you to remove the entire table from your course.


    1.  Adding a link lets you insert a clickable connection to another webpage, document, or resource.
    2. Choose to open the link in the same page or in a new page for user navigation convenience.
    3. Users can access linked content directly by clicking on the specified text or image. 

    Clear Format

    1. This removes all formatting styles from selected text. 
    2. Reverts text to the default style.


    1. Please Note: The Bubble Menu Editor will remain same wherever needed inside the Interactives.

    THANK YOU!

      • Related Articles

      • Bubble menu

        Enhanced Editor for the Bubble Menu The Bubble Menu in the Section Editor now sports a fresh look, mirroring features seen in the Loree Editor highlighted in green in the image below: The Section body of the bubble menu for Editor contains following ...
      • Release Notes for Loree A2403.1

        Published on: 17/07/2024 LOREE INTERACTIVES REVAMP! We're excited to announce the release of our revamped Interactive Tool. This update brings enhanced functionality, improved user experience, and new features designed to help you get the most out of ...
      • Release notes for Loree A2304.1

        12 Oct 2023/Feature Enhancements and Fixes Feature Enhancements New Feature: Add Documents as new element in Loree editor As a user of Loree, you will now have the capability to easily add documents within the Loree editor using the document element. ...
      • Release notes for Loree A2303.4

        Issue Fixes: UI fix on Font dropdown in Table Element When a user selects a specific row/column on a table element and clicks on the font family menu to alter the font style, the font family name appears in the full name in the previous version. ...
      • Release notes for Loree A2304.5

        08 December, 2023 Table of Contents New Features Enhancements Bug Fixes AI Magic Text Editor Math Equation Smart Color Picker Enhanced Color Picker Preview External audio elements in migrated contents Element preset and spacing Pressing Enter key on ...